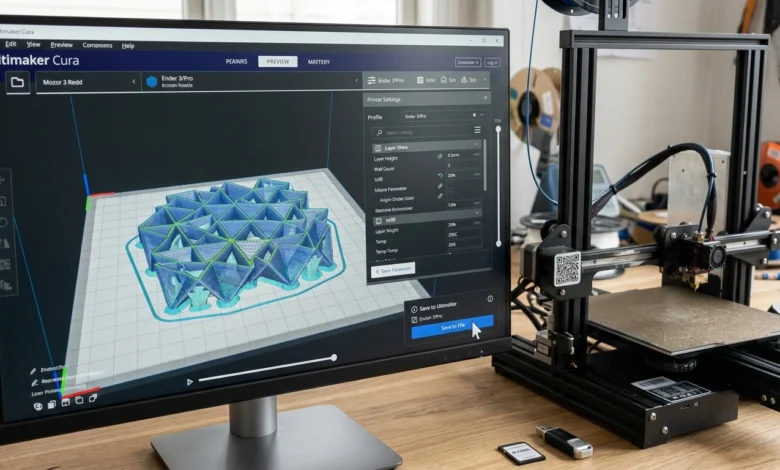
Preparing a 3D model for printing involves more than downloading an STL file and sending it to a printer. The model needs to be converted into instructions that the printer can understand, and this is where Cura software fits into the workflow.
Cura is a slicing application that prepares digital 3D models for printing by dividing them into layers and generating G-code. Before slicing, users can select their printer nozzle material layer height infill, speed, supports, and other parameters that influence the final result.
This guide focuses on the settings and workflow that matter most in real printing. It explains how to configure a printer, prepare an STL or 3MF file, adjust important slicing options, inspect the preview, and deal with problems such as stringing, warping, poor first layers, and incorrect printer profiles.
Table of Contents
How Cura Software Turns a 3D Model Into a Printable File
A slicer acts as the bridge between a 3D model and the physical printer. The original model describes the shape of the object, while the sliced file contains the movements and extrusion instructions required to produce that shape.
The basic workflow is:
3D model → printer profile → slicing settings → layer calculation → preview → G-code
Import the 3D Model
Cura commonly works with formats such as STL and 3MF. After importing a model, check its dimensions and position on the virtual build plate.
A model that was created in millimeters but exported with an incorrect scale can appear far too large or small. Checking dimensions before slicing prevents an avoidable failed print.
Select the Printer Profile
The printer profile tells the slicer important information about the machine, including build volume, extruder arrangement, and available nozzle configuration.
Using the correct profile is important because a model can look perfectly fine in the workspace while still producing unsuitable printer instructions if the machine definition is wrong.
Apply Slicing Settings
The slicer calculates individual layers according to the selected settings. Layer height, walls, infill, temperature, speed, retraction, cooling, and supports can all change the generated toolpath.
Inspect the Preview
The preview is one of the most useful stages of the workflow. Instead of immediately exporting the file, move through the layers and look for missing walls, unexpected gaps, excessive travel movements, or support structures that are not needed.
Generate G-Code
After the slice looks correct, the resulting G-code can be saved for the appropriate printer workflow. The file should be transferred using the method supported by the printer, such as a memory card, USB connection, or network workflow.
Cura Slicer Software Setup: Printer, Nozzle & Material
A reliable setup starts with the hardware rather than the model. Before changing print-quality settings, confirm that the slicer knows which printer and nozzle are being used.
Add the Correct Printer
Select the exact printer model when an official profile is available. Check the build volume and make sure it corresponds with the physical machine.
If the printer is not listed, a custom profile may be possible, but its dimensions and machine settings should be entered carefully rather than copied from an unrelated printer.
Confirm the Nozzle Diameter
Nozzle diameter affects the range of practical line widths and layer heights. A standard 0.4 mm nozzle can produce a balance between detail and printing speed, while larger nozzles can be useful when faster material deposition is more important than fine detail.
The slicer should be configured for the nozzle actually installed on the printer.
Select the Filament
Material selection affects temperature, cooling, retraction, and other settings. PLA, PETG, and ABS do not behave identically, so using the same profile for all three can produce inconsistent results.
Start with the filament manufacturer’s recommended temperature range and make small adjustments based on the actual printer, nozzle, filament brand, and print conditions.
Check the Build Area
Place the model completely inside the printable region. Pay attention to the skirt, brim, raft, and support structures because these can extend beyond the model itself.
A model fitting on the virtual plate does not necessarily mean every additional feature will fit.
Cura Software Settings That Actually Change Print Quality
Hundreds of slicer options can make the interface look complicated, but only a smaller group has a major effect on everyday prints. Understanding these settings is more useful than changing random values until a print succeeds.
Layer Height
Layer height affects visible detail, vertical resolution, and print time.
A smaller layer height can improve curved surfaces and fine details but usually increases printing time. A larger layer height can reduce print time when extreme detail is not required.
For a functional part, there is often little reason to choose the smallest available layer height if the geometry does not benefit from it.
Wall Line Count
Walls form the outer shell of the printed object. Increasing wall count can improve strength and surface consistency, particularly around holes and edges.
For functional parts, wall thickness can sometimes contribute more to strength than simply increasing infill.
Infill Density
Infill determines how much of the interior is filled with the selected pattern. Higher density generally increases material use and can increase strength, but the result depends heavily on the part’s geometry and wall structure.
A solid-looking print does not automatically require very high infill.
Print Speed
Higher speed can reduce printing time, but the printer must still melt and deposit material consistently. Excessive speed can contribute to poor surface quality, weak layer bonding, ringing, or under-extrusion.
If quality suddenly deteriorates after increasing speed, returning to a more conservative value is often a better starting point than changing several unrelated settings.
Nozzle Temperature
Temperature affects how easily filament flows through the nozzle and bonds between layers. Too little heat can contribute to weak bonding or inconsistent extrusion, while excessive heat can increase stringing or soften fine details.
Use the filament manufacturer’s recommended range as the starting point rather than treating one temperature as universal.
Build Plate Temperature
Bed temperature can influence first-layer adhesion and warping. The appropriate value depends on the filament and printer.
If the first layer repeatedly fails, changing bed temperature alone may not solve the problem. Bed leveling, nozzle height, surface cleanliness, initial-layer speed, and adhesion settings should also be checked.
How to Slice an STL in Cura Slicer Software
Once the printer profile and material are correct, slicing an STL is a straightforward process. The important part is checking the model and preview before sending the resulting file to the printer.
1. Import the Model
Open the slicer and load the STL or 3MF file. Check the dimensions immediately after importing.
If the object appears much larger or smaller than expected, verify the model’s units before continuing.
2. Position and Orient the Model
Place the model flat or orient it according to how it needs to be printed.
Orientation affects:
- Support requirements
- Surface finish
- Layer direction
- Strength
- Print time
For mechanical parts, orientation can also affect how forces travel through the finished object.
3. Choose the Print Profile
Select an appropriate quality profile rather than immediately changing dozens of individual settings.
A standard profile can provide a useful starting point, after which specific values can be adjusted for the model and material.
4. Check Material and Nozzle Settings
Confirm the selected filament and nozzle diameter match the hardware.
A mismatch can result in incorrect temperature recommendations, unsuitable layer heights, or unexpected extrusion behavior.
5. Add Supports Where Required
Supports are useful for overhangs that cannot be printed reliably in mid-air.
Do not automatically support every model. Excessive supports increase material use, print time, and cleanup work.
Look at the model from several angles and identify areas where the printer would otherwise need to deposit material without sufficient support underneath.
6. Slice the Model
After reviewing the settings, start the slicing process.
The application calculates the toolpaths and produces a layer-by-layer representation of the print.
7. Inspect the Preview
Do not skip this stage.
Move through the layers and look for:
- Missing walls
- Unexpected gaps
- Incorrect supports
- Large travel movements
- Infill problems
- First-layer issues
- Areas that are not actually being printed
The preview can reveal problems before filament, time, and electricity are spent on a failed print.
8. Save the G-Code
If the preview looks correct, save the generated G-code using the transfer method supported by your printer.
Keep the original model and sliced file together so that you can identify which settings were used if you need to reproduce the print later.
If you’re also configuring gaming hardware, our Gravastar Software guide explains device setup, firmware updates, wireless connections, and troubleshooting in more detail.
Settings for PLA, PETG and ABS
Different filaments require different approaches. There is no single combination of temperature, cooling, speed, and retraction that should be copied across every material.
PLA
PLA is generally easier to print than many engineering-oriented materials and usually benefits from strong part cooling after the first layers.
Pay attention to:
- Nozzle temperature
- Cooling
- First-layer adhesion
- Print speed
- Retraction
If PLA produces excessive stringing, temperature and retraction are two settings worth checking first. If small features look soft, excessive heat or insufficient cooling may be involved.
PETG
PETG can produce strong parts but often requires more attention to stringing and surface behavior than PLA.
Useful areas to tune include:
- Nozzle temperature
- Retraction
- Cooling
- Print speed
- Build plate temperature
PETG can also adhere strongly to some build surfaces, so use the manufacturer’s recommendations for the particular print surface.
ABS
ABS is more sensitive to environmental conditions and can warp when cooling is uncontrolled.
Important considerations include:
- Enclosure or controlled environment where appropriate
- Bed temperature
- Cooling strategy
- First-layer adhesion
- Print temperature
Rather than copying PLA settings and increasing the temperature, use a profile intended for ABS and adjust it gradually based on the printer and filament.
Settings for Better First-Layer Adhesion
The first layer establishes the foundation for everything printed above it. If it is too high, too low, too fast, too cold, or poorly bonded to the surface, later layers cannot compensate for the problem.
Initial Layer Height
A suitable initial layer height can make it easier for the material to establish contact with the build surface.
However, increasing the value will not fix an incorrectly positioned nozzle.
Initial Layer Speed
Slowing the first layer can give the material more time to adhere to the surface and can make the extrusion easier to observe.
This is particularly useful when diagnosing first-layer problems.
Build Plate Temperature
Use a temperature appropriate for the filament and build surface. Too little heat can reduce adhesion, while excessive heat can affect the bottom of the print.
Build Plate Adhesion
A skirt can help prime the nozzle without directly supporting the model.
A brim extends the contact area around the model and can help with parts that have small footprints.
A raft creates a separate base beneath the model but uses more material and generally takes longer to print.
Bed Leveling and Z-Offset
If one side of the first layer is too thin while another side barely touches the surface, check bed leveling before changing numerous slicer settings.
If the entire first layer is consistently too far from or too close to the build surface, Z-offset may require adjustment.
Fix Stringing, Warping, Weak Parts and Poor Surface Quality
A good troubleshooting approach is to connect the visible problem with the settings most likely to cause it.
Excessive Stringing
Thin strands of filament appearing between separate sections can be related to:
- Retraction settings
- Nozzle temperature
- Travel behavior
- Filament moisture
Start by checking temperature and retraction rather than changing every movement setting at once.
Warping
Corners lifting from the build plate can result from uneven cooling, insufficient adhesion, material behavior, or environmental conditions.
Check:
- First-layer adhesion
- Bed temperature
- Cooling
- Build surface
- Printer environment
For materials such as ABS, controlling the surrounding temperature can be particularly important.
Weak Parts
If a part breaks easily, examine:
- Wall count
- Infill density
- Layer bonding
- Nozzle temperature
- Print orientation
Increasing infill alone is not always the best solution. Adding walls or changing the orientation can sometimes produce a larger improvement.
Rough Surface
Poor surface quality can be associated with excessive speed, unsuitable layer height, temperature problems, mechanical movement, or inconsistent extrusion.
Change one variable at a time and compare the result rather than making several adjustments simultaneously.
Poor Overhangs
If an overhang looks rough or droops, examine cooling, print speed, layer height, and support settings.
A model that exceeds the printer’s practical overhang capability may require a different orientation or additional support instead of simply increasing cooling.
How to Check a Cura Slice Before Sending G-Code
The preview should be treated as a final inspection rather than a decorative feature.
Start at the first layer and move upward through the model. Check whether the walls, infill, supports, and top layers appear where expected.
Pay particular attention to:
- Thin sections
- Small holes
- Bridges
- Overhangs
- Support interfaces
- Internal cavities
- Areas with sudden changes in geometry
Also review the estimated print time and material usage. An unexpectedly large increase can indicate excessive supports, an incorrect model scale, or a profile that does not match the intended print.
If something looks wrong in the preview, fix it before exporting the G-code. A few minutes spent checking the slice can prevent hours of printing a defective part.
Part 3 mein focus printer detection, settings reset, practical troubleshooting, FAQ, aur conclusion par hai. Primary keyword ko natural distribution ke saath rakha hai.
Whst if it is Not Detecting My 3D Printer
A printer can work normally from its own controls while still failing to appear in the slicer. This does not automatically mean the printer is defective. The problem may be related to the selected machine profile, connection method, network configuration, or the way the printer communicates with the computer.
Check the Printer Profile
First confirm that the selected machine matches the physical printer. An incorrect profile can prevent the expected connection options from appearing.
If the printer was added manually, review its dimensions, extruder configuration, and connection settings.
Check the Connection Method
Depending on the printer, communication may use:
- USB
- Wi-Fi
- Ethernet
- Memory card
- USB drive
Not every printer supports direct control from a slicer. Some machines require the G-code file to be saved and transferred separately.
Check Windows or Network Recognition
For USB connections, make sure Windows recognizes the printer or connected interface. For network-connected printers, confirm that the computer and printer are on the appropriate network and that the device is reachable.
Restarting both the printer and computer can also clear temporary connection problems.
Use G-Code Without Direct Printer Control
If your printer does not support direct communication, you can still use the slicer to prepare the print.
Generate the G-code, save it using the format required by the printer, and transfer the file through the supported storage or network method.
This means a printer does not necessarily need to appear as a directly controllable device for slicing to be useful.
Why Cura Settings Reset or Do Not Apply
Sometimes a setting appears to change but the final slice does not behave as expected. This can happen when another profile or model-specific setting takes priority.
Check the Active Profile
Make sure you are editing the profile actually being used for the current print. Changing a value in one profile will not necessarily change another active profile.
Check Material Settings
Material profiles can contain their own temperatures, cooling behavior, and other parameters. Selecting a different filament profile can therefore change values that you previously adjusted.
Check Per-Model Settings
Some settings can be applied specifically to an individual model or section of a model. If a value appears different from the general profile, check whether a model-specific adjustment is overriding it.
Avoid Changing Too Many Settings at Once
If you change temperature, speed, retraction, cooling, walls, and infill simultaneously, it becomes difficult to identify which change improved or damaged the result.
For reliable tuning, change one important variable at a time and keep notes of the results.
Which Cura Settings Should You Change First?
Beginners often open the settings panel and see a long list of options. Most prints do not require changing everything.
A sensible order is:
- Printer profile — confirm the machine.
- Material — select the correct filament.
- Nozzle size — match the installed nozzle.
- Layer height — choose the required quality level.
- Walls — adjust for surface quality and strength.
- Infill — choose the required internal structure.
- Temperature — match the filament and printer.
- Speed — balance quality and print time.
- Retraction — tune when stringing appears.
- Supports — add them where the geometry requires them.
This order keeps the setup manageable and prevents users from spending time tuning advanced options before the basic machine and material configuration is correct.
Cura Software vs Cura Slicer Software: Is There a Difference?
The two phrases generally describe the same application in this context.
It is the broader term used when referring to the application as a whole.
Cura slicer software emphasizes its main function: taking a 3D model and converting it into layer-by-layer printer instructions.
The term “slicer” is useful because it describes what the application actually does. It calculates toolpaths, extrusion movements, speeds, temperatures, supports, and other instructions based on the selected printer and settings.
FAQs
What is Cura software used for?
It is used to prepare 3D models for printing. Users can import models, select a printer and material, adjust slicing parameters, generate a layer preview, and create G-code for a compatible 3D printer.
Is this software is free?
Cura is available as a free 3D-printing slicer. Users should obtain the application from a legitimate source and use the version appropriate for their operating system.
What does Cura slicer software do?
It converts a 3D model into instructions that a 3D printer can follow. The slicer calculates layers, walls, infill, supports, travel movements, and extrusion paths based on the selected settings.
Can Cura convert STL to G-code?
Yes. An STL can be imported, configured for the intended printer and material, sliced, previewed, and exported as G-code when the selected workflow supports that printer.
Why is Cura not detecting my printer?
The cause may be an incorrect printer profile, unsupported connection method, USB problem, network issue, or a printer that requires G-code to be transferred separately rather than controlled directly from the slicer.
Which settings affect print quality the most?
Layer height, walls, temperature, speed, cooling, retraction, supports, and first-layer settings can have significant effects. The correct combination depends on the printer, nozzle, filament, and model.
Can Cura be used with PLA, PETG and ABS?
Yes. These materials can require different temperature, cooling, speed, adhesion, and environmental settings. Start with a profile appropriate for the specific filament and adjust it based on test prints.
Conclusion
A reliable 3D-printing workflow starts with the correct printer profile, nozzle, material, and model orientation. From there, the most important task is choosing settings that match the required balance between print quality, strength, material consumption, and printing time.
Cura software makes this process manageable by bringing the slicing workflow into one application. The best results do not come from using the highest or lowest value for every setting. They come from understanding what each setting changes, checking the layer preview, and making controlled adjustments when a real printing problem appears.
Before sending a file to the printer, always inspect the first layer, supports, walls, infill, and critical geometry in the preview. That simple check can catch many problems before they turn into a failed print.