HyperX devices are widely used by gamers, content creators, and professionals who want reliable peripherals with customizable features. Many users search for this software when setting up a new keyboard, mouse, or microphone, while others are looking for ways to update firmware, customize RGB lighting, or configure device profiles.
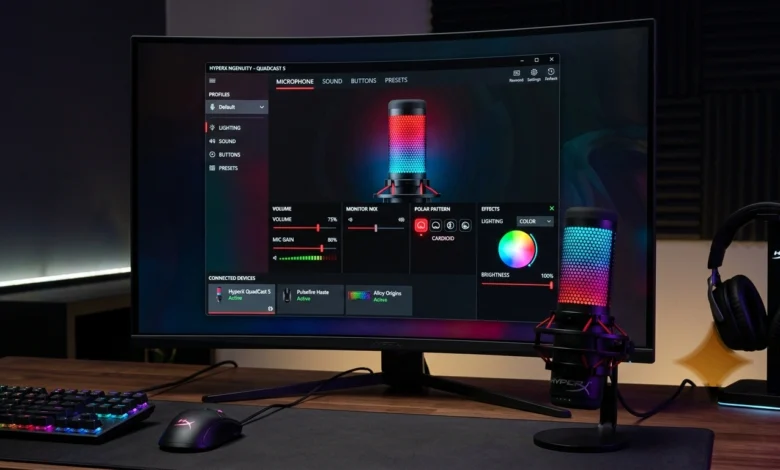
The official HyperX software, known as HyperX NGENUITY provides centralized controls for compatible HyperX products. Through a single interface, users can personalize lighting effects, adjust performance settings, manage macros, update firmware, and save multiple profiles for different tasks or games.
This guide explains what is, which devices it supports, how HyperX QuadCast software works, common installation steps, troubleshooting solutions, and best practices for getting the most from compatible HyperX peripherals.
Table of Contents
What Is HyperX Software?
This refers to the official management application used to configure compatible HyperX gaming peripherals. The primary application allows users to customize supported devices without modifying hardware settings manually.
Depending on the connected device, the software can be used to:
- Customize RGB lighting.
- Create and manage macros.
- Adjust mouse DPI settings.
- Save multiple user profiles.
- Install firmware updates.
- Configure supported device settings.
Rather than changing settings directly on each peripheral, NGENUITY provides one centralized dashboard where users can manage compatible HyperX hardware from a single application.
For users with multiple HyperX products, centralized management simplifies customization while helping maintain consistent settings across different devices.
Which HyperX Devices Work With Software?
Not every HyperX product requires software, but many modern peripherals support additional customization through HyperX NGENUITY.
Common supported devices include:
HyperX QuadCast S
The RGB-enabled QuadCast S supports lighting customization, firmware updates, and device management through NGENUITY.
HyperX Alloy Origins
Users can customize RGB lighting, create keyboard profiles, configure Game Mode, and assign macros for supported keys.
HyperX Alloy Elite Series
Supported models allow lighting customization and profile management through the software.
HyperX Pulsefire Gaming Mice
Several Pulsefire models support:
- DPI customization.
- RGB effects.
- Macro assignments.
- Performance profiles.
- Firmware updates.
Compatible Wireless Devices
Supported wireless peripherals can also display battery status while allowing users to manage device settings from the same interface.
Checking compatibility before installation helps ensure that all software features are available for a specific HyperX device.
Also Read: What Is 493xds5.0 in Software? A Complete Guide to Software Version Management
HyperX NGENUITY Features Explained
One reason many users install this software is the ability to customize supported devices beyond their factory settings.
Some of the most useful features include:
RGB Lighting Customization
Users can personalize lighting zones, colors, brightness levels, and effects on compatible keyboards, mice, microphones, and other supported peripherals.
DPI Configuration
Gaming mice allow multiple DPI presets, making it easy to switch between precision work and faster gaming movements.
Macro Recording
Supported keyboards and mice allow repetitive commands to be assigned to specific buttons or keys, improving productivity and gameplay efficiency.
Firmware Updates
Firmware updates improve compatibility, resolve reported issues, and introduce support for new features on compatible devices.
Device Profiles
Users can create different profiles for work, gaming, streaming, or creative tasks and switch between them whenever required.
By combining these customization options into one application helps users manage compatible devices more efficiently while maintaining consistent settings across different workflows.
HyperX QuadCast Software Guide
One of the most searched topics related to this software is HyperX QuadCast software. Many users purchase the microphone expecting additional software controls and want to know whether any setup is required before recording, streaming, or participating in online meetings.
The answer depends on the microphone model. The standard HyperX QuadCast is designed to operate as a plug-and-play USB microphone, meaning it can be used immediately after connecting it to a supported computer. The HyperX QuadCast S, however, supports additional customization through HyperX NGENUITY, allowing users to personalize RGB lighting and install firmware updates when available.
Does HyperX QuadCast Require Software?
For basic recording, no additional software is required. Windows automatically recognizes the microphone, allowing users to begin using supported communication, streaming, or recording applications without manual driver installation.
Users who own the RGB-enabled QuadCast S can install HyperX NGENUITY to access supported customization features beyond the default hardware settings.
Available Customization
Depending on the device model, supported options may include:
- RGB lighting customization.
- Firmware management.
- Device profile management.
- Lighting effect synchronization.
- Brightness adjustments.
Audio controls such as microphone gain and polar pattern selection continue to be managed directly through the physical controls built into the microphone.
Firmware Updates
Firmware updates help improve compatibility and resolve reported issues for supported devices. Before updating firmware, users should avoid disconnecting the microphone until the installation process has been completed successfully.
Keeping firmware updated also helps maintain compatibility with newer operating system updates and future software improvements.
How to Install this Software
Installing this software is a straightforward process when using supported devices. Following the correct installation procedure helps ensure that peripherals are detected correctly and receive the latest available firmware updates.
Step 1: Download HyperX NGENUITY
Download the latest version of HyperX NGENUITY from the official HyperX support page or the Microsoft Store to ensure you are using the most recent release.
Step 2: Install the Software
Run the installer and complete the installation by following the on-screen instructions. After installation, restart the computer if prompted.
Step 3: Connect Your HyperX Device
Connect your compatible keyboard, mouse, microphone, or other supported peripheral using the recommended USB connection. Wait for Windows to recognize the device before launching the software.
Step 4: Detect the Device
Open HyperX NGENUITY and allow the application to identify connected hardware. Compatible devices should appear automatically within the dashboard.
Step 5: Check for Firmware Updates
If a firmware update is available, review the release information before beginning the update. Do not disconnect the device while the update is in progress.
Step 6: Customize and Save Profiles
After setup is complete, users can adjust supported settings, create custom profiles, configure RGB lighting, assign macros where available, and save personalized configurations for future use.
HyperX Software Not Detecting Your Device?
Occasionally, users may find that it does not recognize a connected device. In many cases, the issue can be resolved through a few basic troubleshooting steps before assuming a hardware problem.
Common solutions include:
Confirm Device Compatibility
Not every HyperX product supports HyperX NGENUITY. Verify that your specific model is listed among the supported devices.
Check the USB Connection
Reconnect the device using a different USB port and avoid using USB hubs during troubleshooting whenever possible.
Restart the Software
Close HyperX NGENUITY completely and restart both the application and the computer before checking whether the device is detected.
Install Available Firmware Updates
If the device is recognized but operating incorrectly, installing the latest firmware may resolve compatibility or stability issues.
Update Windows
Keeping Windows updated helps ensure proper communication between hardware drivers and supported peripherals.
Reinstall HyperX Software
If detection problems continue, reinstalling HyperX NGENUITY may resolve corrupted installation files or software configuration issues.
Following these troubleshooting steps resolves many common detection problems while helping users restore normal functionality without unnecessary hardware replacement.
Common Problems and Solutions
Even though HyperX NGENUITY is designed to simplify device management, users may occasionally experience software-related issues after installation or firmware updates. Most problems can be resolved through basic troubleshooting without replacing the hardware.
RGB Lighting Not Working
If RGB effects are unavailable, first verify that the connected device supports lighting customization through HyperX NGENUITY. Restart the software, reconnect the device, and check whether a firmware update is available. In many cases, installing the latest firmware restores normal lighting controls.
Firmware Update Stuck
Interrupting a firmware update may prevent the device from functioning correctly. If an update appears frozen, avoid disconnecting the device immediately. Wait several minutes before restarting the application and checking whether the update completed successfully. If necessary, reinstall HyperX NGENUITY and repeat the update process.
Profiles Not Saving
Custom profiles may fail to save if the software does not have the required permissions or if synchronization is interrupted. Running the software with appropriate system permissions and saving profiles after each modification can help prevent configuration loss.
Software Crashes After Launch
Unexpected application crashes may occur because of outdated software, operating system updates, or corrupted installation files. Installing the latest version of HyperX NGENUITY and keeping Windows updated often resolves these issues.
Device Disconnects Randomly
Intermittent disconnections are commonly related to USB ports, cables, or power management settings. Connecting the device directly to the computer instead of using a USB hub can improve stability.
Addressing these common issues methodically helps restore normal functionality while minimizing unnecessary downtime.
Tips to Get Better Performance
Proper maintenance can improve both software stability and device performance over time. Following a few simple practices helps ensure that supported HyperX peripherals continue operating reliably.
- Keep HyperX NGENUITY updated to the latest available version.
- Install firmware updates whenever they are officially released for your device.
- Save backup profiles before making major configuration changes.
- Connect devices directly to the computer whenever possible.
- Periodically review RGB, DPI, and macro settings to ensure they still match your current workflow.
- Keep Windows updated for improved hardware compatibility and security.
- Restart the software after major firmware updates to verify that all changes have been applied correctly.
These routine maintenance steps can reduce software issues while helping users get the most from compatible HyperX devices.
FAQs
Is HyperX NGENUITY free?
Yes. HyperX NGENUITY is available without charge for supported HyperX devices and can be downloaded from the official HyperX support website or the Microsoft Store.
Does HyperX QuadCast require software?
The standard HyperX QuadCast functions as a plug-and-play USB microphone and does not require additional software for basic operation. The HyperX QuadCast S supports additional customization through HyperX NGENUITY, including RGB lighting and firmware management.
Why isn’t my HyperX device detected?
Detection problems may occur because of unsupported hardware, outdated firmware, USB connection issues, or software installation problems. Verifying compatibility, reconnecting the device, updating firmware, and reinstalling HyperX NGENUITY are common troubleshooting steps.
Can this run on Windows 11?
Yes. HyperX NGENUITY supports modern Windows versions, including Windows 11, provided the connected device is listed among the officially supported HyperX products.
Conclusion
HyperX software provides a centralized way to configure compatible HyperX peripherals through the official HyperX NGENUITY application. From RGB customization and DPI management to firmware updates and profile creation, the software helps users personalize supported devices while maintaining consistent performance across different workflows.
Whether you are configuring a HyperX keyboard, gaming mouse, or HyperX QuadCast S microphone, following the correct installation process, keeping firmware updated, and applying recommended troubleshooting practices can improve both stability and long-term performance. Understanding how the software works allows users to take full advantage of compatible HyperX hardware while reducing common configuration issues.