
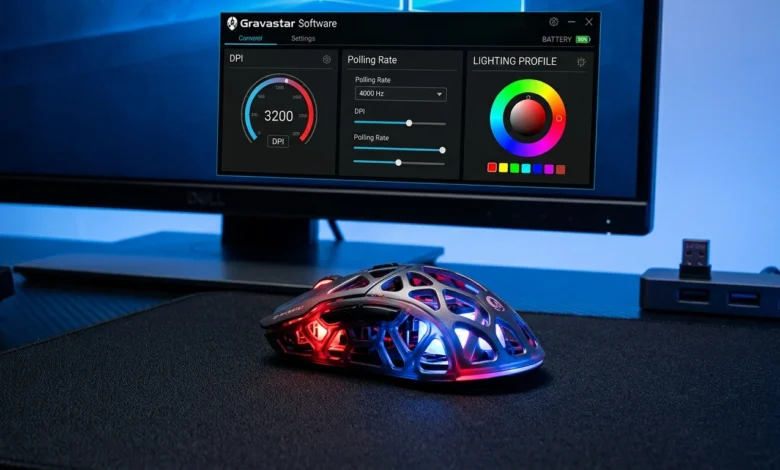
If you have purchased a Gravastar gaming mouse or another compatible peripheral, the hardware itself is only part of the setup. The companion configuration utility can provide access to settings that are difficult or impossible to manage directly from the device. Users commonly look for Gravastar software when they need to change mouse sensitivity, configure buttons, manage lighting, create profiles, or check firmware information.
The important point is that available controls depend on the exact Gravastar model. A gaming mouse may offer DPI and polling-rate controls, while another product may expose different options. Installing an incorrect utility or firmware package can also lead to device-detection problems.
This guide focuses on the practical side of managing Gravastar hardware: identifying the correct utility, completing the initial setup, configuring performance settings, understanding firmware updates, and fixing common connection problems.
Table of Contents
What Is Gravastar Software?
This software is the configuration utility used to manage compatible Gravastar hardware from a Windows computer. Its purpose is different from the basic Windows driver that allows a connected peripheral to function.
Once a supported device is recognized, the available controls may include:
- DPI and sensitivity settings on compatible mice.
- Polling-rate selection.
- Programmable button assignments.
- Macro configuration.
- RGB lighting controls.
- User profiles.
- Battery information for supported wireless devices.
- Firmware management.
The exact interface should not be assumed to be identical across every Gravastar product. A mouse, headset, keyboard, and speaker can have completely different configuration requirements.
That distinction matters when troubleshooting. If Windows recognizes a mouse but the configuration application does not show it, the hardware connection may be working while the installed utility is simply incompatible with that particular model.
What Can You Change With Gravastar Devices?
The practical value of the configuration utility comes from the settings that can affect everyday use. For gaming mice, sensitivity and polling rate are among the most important.
DPI and Sensitivity
DPI determines how much cursor movement is produced by physical mouse movement. A lower value can make small aiming adjustments easier, while a higher value can make navigation faster with less hand movement.
There is no universal DPI setting that works best for every player. FPS players may prefer a lower sensitivity for controlled aiming, whereas desktop users may choose a higher setting for faster navigation.
Polling Rate
Polling rate describes how frequently a compatible mouse reports its position to the computer. Higher values can provide more frequent position updates, but the practical difference depends on the complete system.
A sensible approach is to test different values rather than automatically choosing the maximum setting. Stability, battery life on wireless devices, and system performance can all matter when selecting a configuration.
Button Assignments
Programmable buttons can be mapped to frequently used commands. In games, this can reduce the need to move a hand away from the mouse. For productivity, the same buttons can be assigned to shortcuts used repeatedly in applications.
RGB Lighting
Supported Gravastar hardware can provide lighting controls for colors, effects, brightness, and other visual settings. RGB customization is primarily cosmetic, but profiles can make it easier to identify different configurations.
Profiles
Profiles group several settings together. For example, a user could maintain a competitive gaming profile with a preferred DPI and polling rate while keeping another profile for everyday desktop work.
This is more useful than repeatedly changing individual settings because the complete configuration can be switched as a group.
Gravastar Software Setup: What to Check First
Before starting a setup, identify the exact hardware model. This is the most important step because Gravastar products can use different utilities, firmware packages, and configuration options.
Check the model name on:
- The underside of the device.
- The original packaging.
- The product documentation.
- The purchase record.
- The device information shown by Windows.
Next, determine how the device is connected. A wireless mouse may communicate through a 2.4 GHz receiver or Bluetooth, while a wired connection uses USB. During initial configuration, a direct USB connection can make detection and firmware management easier when the device supports wired operation.
Once the model and connection method are confirmed, install the utility intended for that product rather than choosing software simply because it appears to be a newer version.
After installation, connect the peripheral and allow Windows time to recognize it. Then open the configuration application and check whether the correct device appears before changing settings or starting a firmware update.
This simple verification step can prevent one of the most common setup problems: attempting to configure a device with software intended for a different Gravastar model.
Software, Driver, and Firmware Are Not the Same
These three terms are often confused during setup, but they serve different purposes.
Configuration software provides the interface used to change supported settings.
A Windows driver allows the operating system to communicate with the connected hardware. Basic USB peripherals can often use standard Windows drivers without requiring a separate driver package.
Firmware is stored inside the device itself. A firmware update changes the internal software that controls the hardware and should only be installed when the package matches the exact device model.
This distinction becomes especially important when a device works normally but is missing from the configuration application. In that situation, reinstalling a driver may not solve the problem if the actual issue is model compatibility or the wrong configuration utility.
How to Complete a Setup
A successful setup starts with the correct device and connection method. The most common mistake is installing a utility before confirming which Gravastar model is being configured. Because different peripherals can expose different controls, the model should always be verified first.
1. Identify the Exact Gravastar Model
Check the model name on the device, packaging, or product documentation. Do not assume that software for one Gravastar mouse will work with another model.
This is particularly important when several products have similar names or belong to the same product family.
2. Choose the Correct Connection
For wireless devices, identify whether the peripheral uses:
- 2.4 GHz wireless
- Bluetooth
- USB wired mode
When configuring a new device or troubleshooting detection, USB is often the simplest connection if the hardware supports it. It can also provide a more stable connection during firmware-related procedures.
3. Install the Appropriate Utility
Use the software associated with the specific product rather than downloading an unrelated configuration program. Check the official product documentation or support information for the correct version.
Avoid third-party driver packages that claim to provide universal Gravastar control. They may not contain the correct firmware or configuration files for your hardware.
4. Connect the Device and Check Detection
After installation, connect the peripheral and open the application.
The correct device should appear before you attempt to modify settings. If it does not appear, do not immediately start changing Windows settings or installing random drivers. First verify the connection, model compatibility, and software version.
5. Configure and Save Settings
Once the device is detected, configure only the settings you actually need. Start with DPI, polling rate, button assignments, lighting, and profiles where supported.
Save the configuration and test it in the application or game you normally use. This makes it easier to identify which setting caused a problem if something behaves unexpectedly.
How to Perform a Gravastar Software Update
A software update can refer to an update for the configuration application or, depending on the device and documentation, an update to the peripheral’s firmware. These processes should not be treated as identical.
Check the Current Version First
Before updating, note the version currently installed. If the device is functioning correctly, there is little reason to install an unrelated package simply because it has a newer-looking version number.
For firmware, verify the exact hardware model before proceeding.
Keep the Device Connected
Do not disconnect a peripheral while its firmware is being written. A failed or interrupted firmware process can leave the device in an abnormal state and may require additional recovery steps.
For wireless hardware, use the connection method recommended by the manufacturer for firmware procedures. If wired updating is supported, a direct USB connection can reduce connection-related interruptions.
Restart After Updating
Once an update finishes, restart the configuration utility and check whether the device is detected normally.
Test important settings such as:
- DPI
- Polling rate
- Button assignments
- RGB
- Wireless connection
- Saved profiles
This confirms that the update did not reset or alter the configuration unexpectedly.
Gravastar Software Not Detecting Your Device
Device detection is one of the most frustrating problems during setup. A mouse may work normally in Windows while remaining invisible inside the configuration utility.
That situation usually points toward a compatibility, connection, or software-recognition issue rather than an immediate hardware failure.
Check the USB Connection
If the device supports USB, connect it directly to the computer instead of using a hub. Try another USB port if the first one does not work.
For wireless devices, reconnect the receiver and check that the mouse or peripheral is switched on.
Check the Wireless Mode
Some wireless peripherals can operate through more than one connection method. Make sure the device is using the mode supported by the configuration process.
If the application requires the 2.4 GHz receiver but the device is currently connected through Bluetooth, the software may not expose the expected controls.
Confirm Software Compatibility
Verify the exact model against the utility you installed. A working Windows connection does not guarantee that the installed configuration application supports that model.
This is one reason installing multiple unrelated versions of device software can make troubleshooting harder.
Restart Windows
Close the configuration utility, disconnect the peripheral, restart Windows, and reconnect the device after the system loads.
A restart can clear temporary USB or device-service problems without changing any permanent settings.
Reinstall the Configuration Utility
If the correct device and connection are confirmed but the application still cannot detect the hardware, uninstalling and reinstalling the correct utility can resolve corrupted installation files.
After reinstalling, connect the device again and check detection before changing any configuration.
If you’re also setting up another gaming mouse, our Attack Shark Software guide covers installation, X3 configuration, firmware updates, and common detection problems.
Common Gravastar Configuration Problems
Not every issue requires a firmware update. Some problems are caused by individual settings or connection conditions.
DPI Keeps Changing
Check which profile is active and make sure the desired DPI value has been saved. Some applications may also load their own profile when they start.
RGB Settings Do Not Apply
Confirm that the particular device supports software-controlled lighting. If it does, check whether another profile is overriding the selected effect.
Wireless Connection Drops
Check battery level, receiver placement, and distance between the device and receiver. A direct receiver connection can be preferable to a USB hub.
Settings Disappear
Save the profile after making changes and verify that the configuration has been written to the device or application as supported by that model.
Firmware Update Will Not Start
Confirm that the firmware package matches the exact hardware model and that the device is connected using the manufacturer’s recommended method. Never force a firmware file intended for another product.
Best Ways to Configure Gravastar Devices
Once the device is detected correctly, the next step is choosing settings that fit the way you actually use the hardware. There is no single configuration that works for every player, so the better approach is to adjust one setting at a time and test the result.
Choose DPI for the Task
For competitive FPS games, many players prefer a lower sensitivity because it allows controlled aiming. Higher DPI can be more convenient for desktop navigation and large displays.
Instead of copying another player’s settings, start with a comfortable value and make small adjustments until cursor movement feels consistent.
Select a Suitable Polling Rate
A higher polling rate can provide more frequent position reports, but it can also increase power consumption on compatible wireless mice. If battery life matters, testing a lower rate may provide a better balance.
Create Separate Profiles
Use individual profiles for different games and applications. A gaming profile might use one DPI and button arrangement, while an office profile can use different shortcuts.
Saving these configurations prevents repeated manual changes.
Keep Firmware Current
Firmware updates can address compatibility problems and device-specific bugs. However, an update should only be installed when it is intended for the exact hardware model.
What to Do Before Update
A few precautions can make an update safer.
- Confirm the exact device model.
- Check the current software or firmware version.
- Use the manufacturer’s recommended update package.
- Connect the device using the recommended method.
- Close games and applications that may interact with the peripheral.
- Keep the computer powered during the process.
- Do not disconnect the device while an update is running.
- Restart the configuration utility after completion.
These steps are especially important for firmware because an interrupted firmware process can cause more serious problems than a normal application update.
Setup for Wireless Devices
Wireless configuration can involve an additional step that does not apply to wired peripherals: making sure the receiver and device are communicating correctly.
For a 2.4 GHz setup, place the receiver where it has a clear connection to the mouse or other peripheral. Avoid unnecessary USB hubs or extensions while testing the device.
If the peripheral supports both Bluetooth and 2.4 GHz connectivity, use the connection method recommended for configuration and firmware procedures. Some configuration utilities may recognize a device through one connection type but not another.
After the device appears in the application, test basic functions before changing advanced settings. Check cursor movement, buttons, lighting, battery information, and wireless stability where applicable.
Gravastar Software vs Firmware Update: Which One Do You Need?
The answer depends on what problem you are trying to solve.
If you need to change DPI, buttons, RGB, polling rate, or profiles, you normally need the configuration application.
If the device has a compatibility problem, stability issue, or manufacturer-released device fix, a firmware update may be relevant.
If Windows cannot communicate with the hardware at all, investigate the USB connection, wireless receiver, Bluetooth connection, and Windows device recognition before assuming that a firmware update is required.
This distinction prevents unnecessary updates and reduces the risk of installing an incorrect firmware package.
FAQs
What is Gravastar software used for?
It is used to configure supported Gravastar peripherals. Depending on the product, available controls can include DPI, polling rate, buttons, macros, RGB lighting, profiles, battery information, and firmware management.
How do I complete a setup?
Identify the exact device model, install its compatible configuration utility, connect the peripheral using the recommended method, confirm that it is detected, and then save the required settings.
How do I perform a update?
First determine whether you need an application update or a device firmware update. Check the official support information for the exact model, install the appropriate package, keep the device connected during the process, and restart the utility afterward.
Why is my Gravastar device not detected?
Check the USB connection, wireless receiver, Bluetooth mode, device compatibility, and installed utility. If the correct setup is being used, restarting Windows or reinstalling the configuration application can also help.
Should I update firmware if everything works?
Not necessarily. Firmware updates can provide fixes and compatibility improvements, but users should only install an update that applies to their exact device. There is no benefit in forcing an incompatible firmware package onto working hardware.
Can Gravastar devices work without the software?
Basic functionality may work without the configuration utility, depending on the device. Advanced controls such as custom profiles, RGB effects, button assignments, or firmware management may require the appropriate application.
Conclusion
Managing a compatible Gravastar peripheral becomes much easier once the device model, connection method, configuration utility, and firmware are treated as separate parts of the setup. The correct software can provide access to settings that are unavailable through basic Windows controls, while firmware updates can address device-level compatibility and stability issues.
For the best results, identify the exact model before installing anything, use the recommended connection during setup and updates, save important profiles, and avoid firmware packages that were not designed for the device. These simple precautions can prevent many of the detection and configuration problems users encounter after purchasing a Gravastar peripheral.